
Are you tired of the same old, boring website sliders? Do you want to create stunning, dynamic, and engaging sliders that will captivate your audience? Enter Slider Revolution – the ultimate solution for creating beautiful, interactive sliders for your website. But what exactly is Slider Revolution? In this article, we’ll dive deep into the world of Slider Revolution, exploring its features, benefits, and how to add a custom SVG icon in Slider Revolution slides. With our expert tips and tricks, you’ll be able to create an eye-catching and dynamic slider that’s sure to leave a lasting impression on your website and visitors. So, get ready to revolutionize your website sliders with the help of our detailed guide on the Slider Revolution plugin of WordPress!

Introduction to Slider Revolution
Slider Revolution(SR) is a popular WordPress plugin that allows users to create amazing, interactive sliders and carousels for their websites. Slider Revolution is also called Revolution Slider. It offers a wide range of features, including a drag-and-drop interface, pre-built templates, animations, transitions, and much more, making it a versatile tool for creating visually compelling content. With Slider Revolution, you can easily create sliders for various purposes, such as showcasing products, displaying images, creating banners, and more. Additionally, the plugin is mobile-friendly and responsive, ensuring that sliders look great on any device. Whether you’re a beginner or an experienced web designer, Slider Revolution is an excellent choice for taking your website to the next level and creating engaging sliders that captivate your audience.
Slider Revolution’s Pricing
Slider Revolution is a paid WordPress plugin. It offers a variety of pricing packages to suit your needs and budget. Starting from just $35 per year, you can access the core features of this powerful WordPress plugin and create beautiful slideshows that will make your website stand out. For those looking for even more features and functionality, Slider Revolution’s premium package is available for only $139 per year and unlocks a wealth of advanced tools and customization options. Moreover, the Slider Revolution also offers one-time payment packages ranging from $87 to $365.
With lifetime updates and dedicated support, Slider Revolution’s pricing packages offer unbeatable value for anyone looking to elevate their website’s visual appeal. So why wait? Choose the package that’s right for you and start creating stunning and dynamic slideshows that will boost your website audience. Click the button below to unlock Slider Revolution’s professional-grade features and create stunning, dynamic slideshows that will take your website to new heights. Don’t settle for ordinary – elevate your website with Slider Revolution today!
Once you have purchased the Revolution Slider plugin, you have to upload its zip file to the WordPress plugins directory by navigating to WordPress dashboard > Plugins > Add New. Then, you need to install and activate this plugin. If you don’t know how to install a WordPress plugin, then read our step-by-step guide on how to install and activate a plugin in WordPress.
How to create Slider using the Slider Revolution plugin
To create a slider in Slider Revolution plugin, follow these simple steps:
Step 1: Open Slider Revolution Dashboard
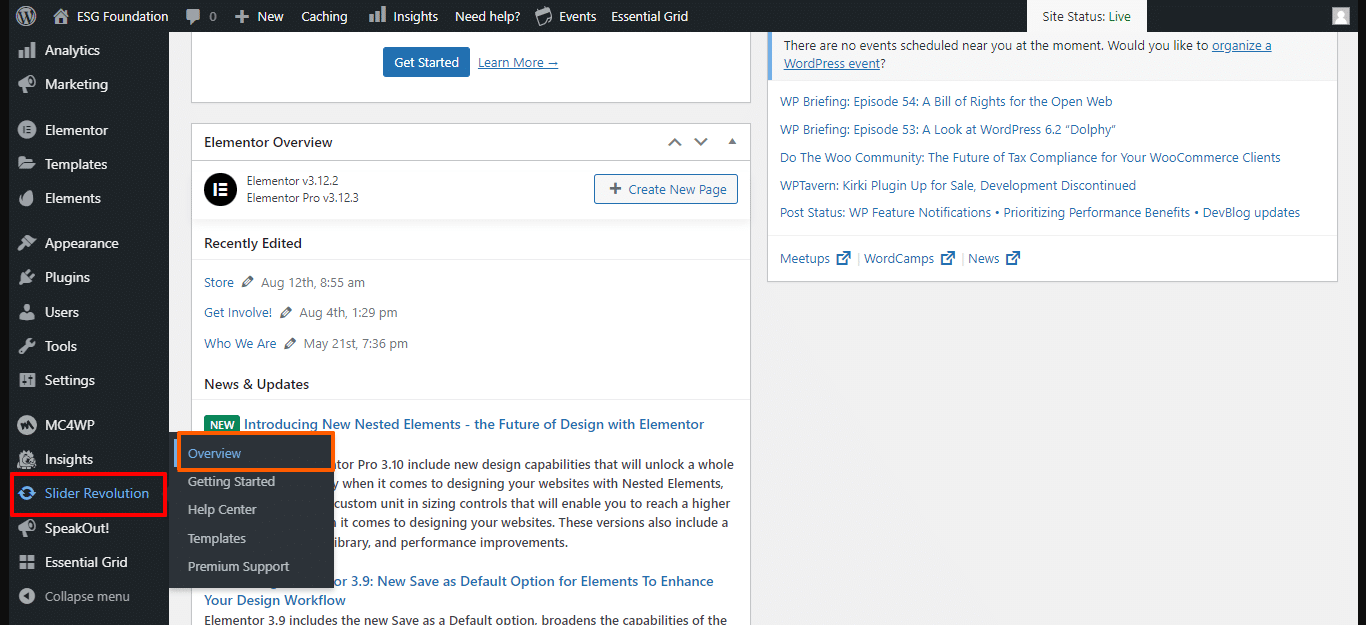
Go to the WordPress dashboard. From the left sidebar, navigate to Slider Revolution > Overview option.
Step 2: Select New Blank Module
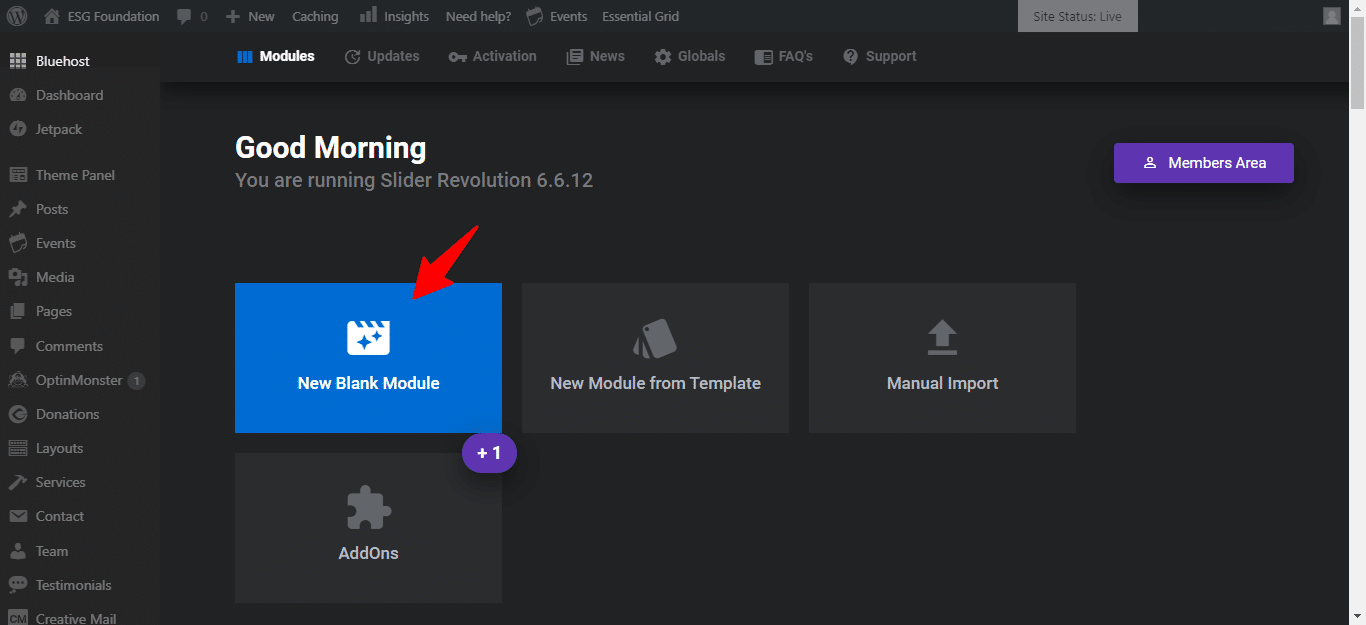
In the Slider Revolution dashboard, click on the New Blank Module option that falls under the Modules tab.
Step 3: Explore Different Features in Slider Revolution
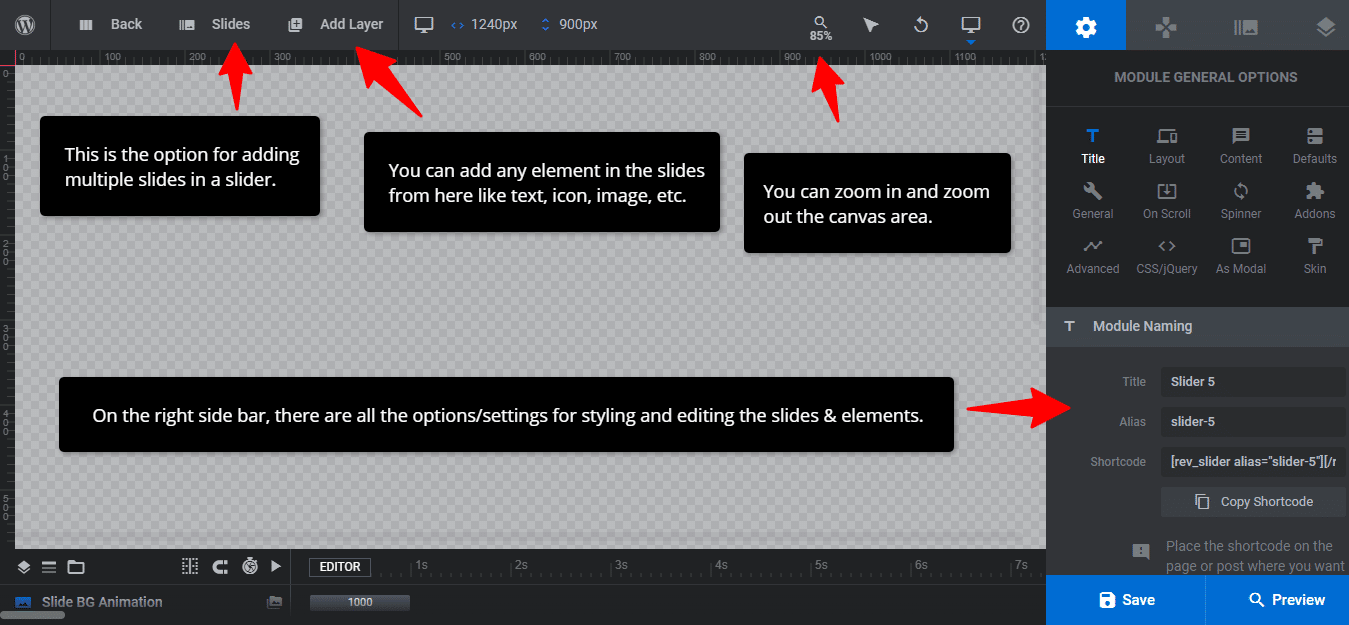
In Slider Revolution, we insert elements in the form of layers on the Canvas area. For example, we insert a background image or color in the background layer then we insert other elements like headings, icons, images, videos, buttons, etc on the front layers. Now, we hope the concept of layers has been cleared to you. If you are still confused about layers then just think of a cake. A cake has also many layers. In the bottom layer, there is a cake base and in the upper layers, we can add cream, strawberries, almonds, nuts, pineapple, etc. Likewise, the slider in Slider Revolution has many layers. You can add different layers in Canvas from the “Add Layer” option of the SR plugin.
If you want to insert multiple slides in the Slider, click on the Slides option from the top bar of SR. A drop-down menu will be opened. Click on the first option “+Add Slide(s)” from the dropdown menu. As a result, a new slide will be created. You can also clone your existing slides by clicking on the clone icon in front of the slide title.
For styling the elements and slides in Revolution Slider, navigate to the right sidebar where you can configure all the settings and styling options for the slider.
Step 4: Insert Background Image in Slide
In the previous step, you explored the basic features and settings of the slider. Now it’s time to actually create and design a slide in the Slider Revolution.
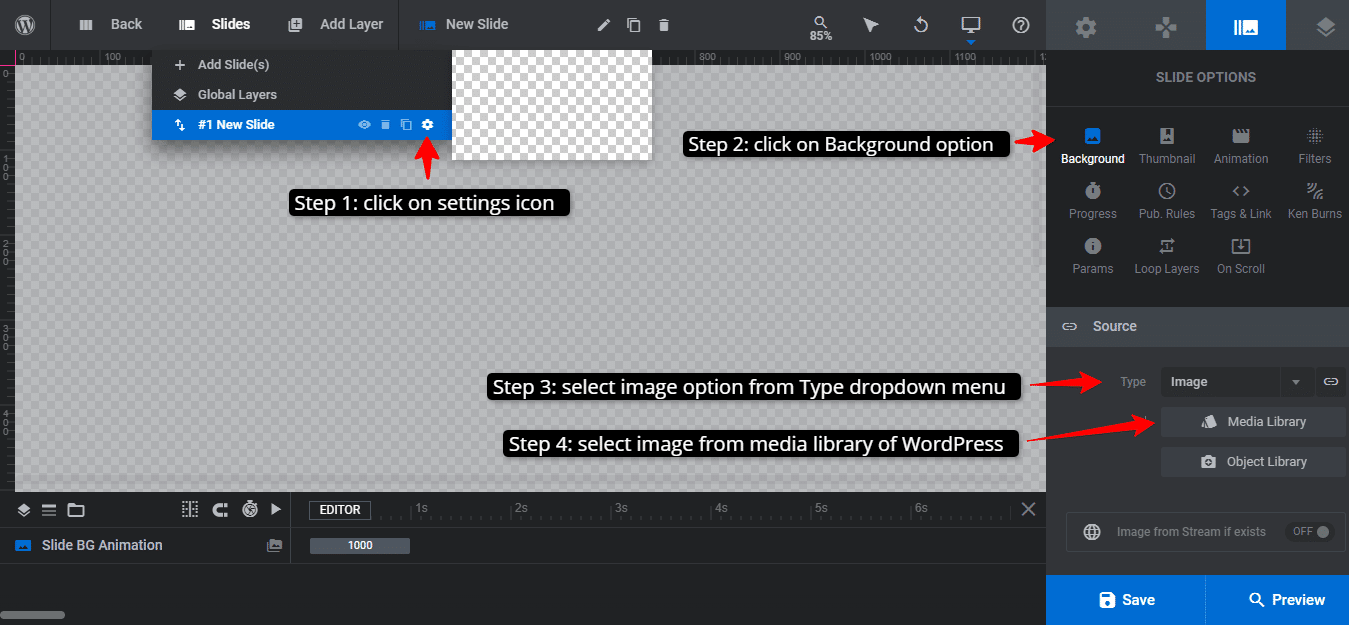
Firstly, click on the Slides option from the top bar. From the dropdown menu, click on the settings icon in front of the slide name. As a result, you will see the Background option on the right sidebar. Select that option. Then navigate to the Source section at the bottom of the right sidebar. Select the Image option from the Type drop-down menu. Lastly, click on the Media Library button below the Type field. Now, your WordPress media library will be opened. You can select any image from there that you want to insert as your slide background.
Step 5: Insert the Heading in Slide
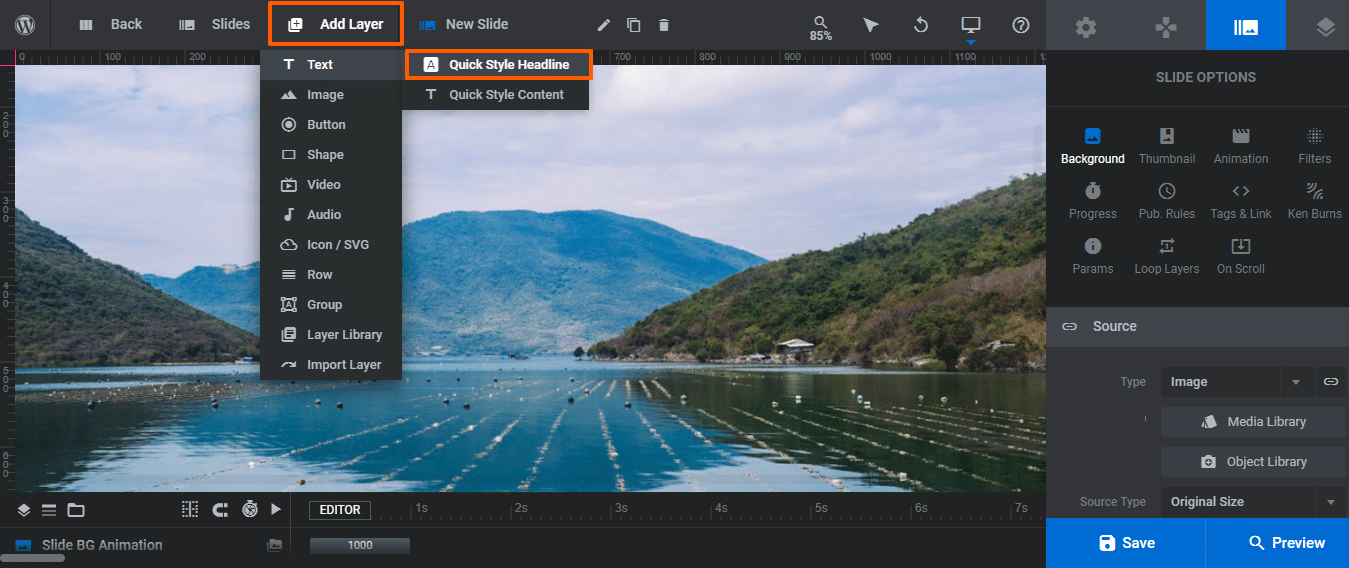
Once you have inserted the background image, the next step is to insert a heading in your slide. To do that, click on Add Layer option from the top bar. In the dropdown menu, navigate to Text > Quick Style Headline.
Step 6: Edit the Heading in Slider Revolution
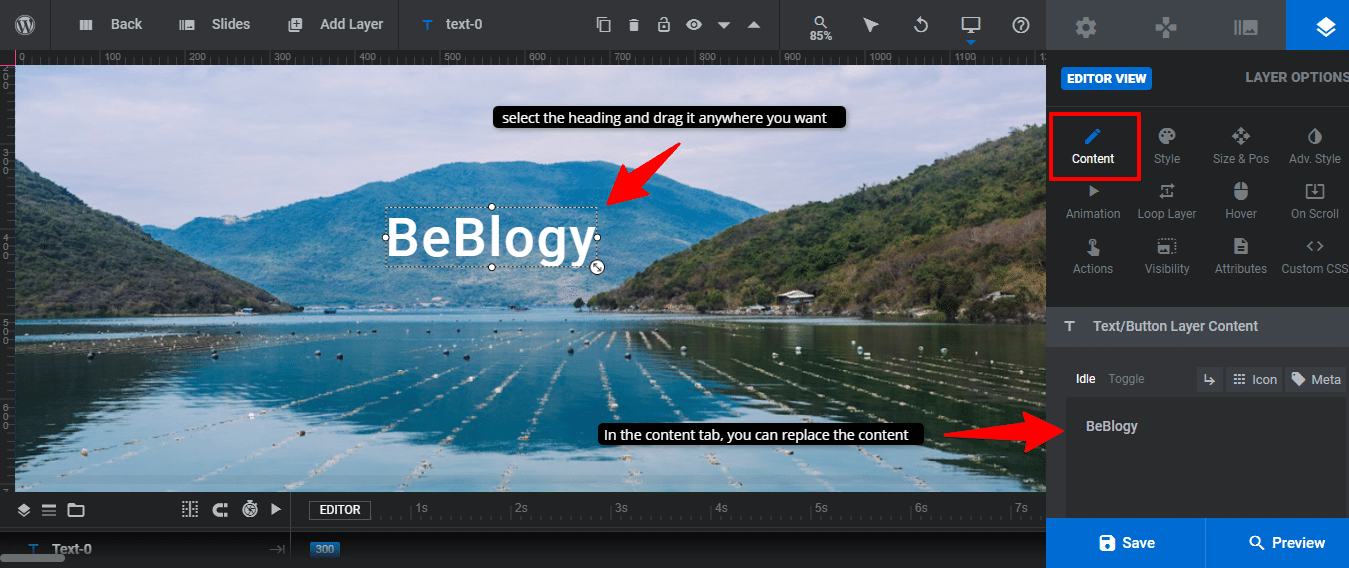
Select the heading that you have inserted in the previous step and drag it anywhere you want in the slide. Then, navigate to the Text/Button Layer Content section that falls under the Content tab. You can edit or replace your heading from that section.
To style the heading, like changing its font size and color, you need to select the heading first. Then navigate to the Style tab from the right sidebar. There you will find different styling options for heading. Just play with them as you want.
We trust that you have acquired the fundamental steps for slider creation and design using the Slider Revolution plugin on WordPress. By incorporating multiple slides and layers in the slider, you can explore further features of this plugin.
If you want to take your Slider Revolution game to the next level, add a touch of uniqueness to your website with custom SVGs in Slider Revolution. SVGs can make your website hero section load faster. Let’s dive in and unleash the concept of SVGs.
What are SVGs
SVG, or Scalable Vector Graphics, is a widely-used file format for creating and displaying high-quality, resolution-independent vector images on the web. In simple words, SVG is one of the image types just like PNG, JPG, JPEG, etc. Unlike raster images, which are made up of pixels, SVGs use mathematical equations to create images that can be scaled up or down without losing quality. This makes SVG an ideal choice for web design, as it can be used to create logos, icons, and other graphics that look sharp and clear on any screen size. Additionally, SVGs are lightweight and can be easily edited using code or vector graphics software, making them a versatile tool for designers and developers alike.
With the rise of responsive web design, SVGs have become an essential element in creating visually compelling websites that work well on all devices. Moreover, if you desire a swift loading time for your website’s hero section, utilizing SVG images can greatly assist you.
How to add Custom SVG Icons in Slider using Slider Revolution
Here is the step-by-step guide on how to upload any custom icon in SVG format to slider revolution using WordPress:
Step 1: Select the Icon/SVG option from Add Layer dropdown menu
In order to add an SVG icon to the Slider Revolution slides, click on the Add Layer option from the top bar of the Slider Revolution panel. Then select the Icon/SVG option from the dropdown menu.
![]()
Step 2: Upload SVG Icon to SVG Library of Slider Revolution
In this step, click on the My SVG Library option from the left sidebar of the SR font library. Then click on the Import SVG Files button at the bottom.
![]()
You can download any SVG image or icon of your own choice from this website: https://www.svgrepo.com/. Then, follow the above screenshot to upload the SVG file in the SVG library of Slider Revolution. We have uploaded a TikTok SVG icon as an example. You can upload any other icon which you want to insert in your slider.
Step 3: Assign a category to the SVG icon
Once you have uploaded your SVG icon file, you will see a Custom File Import Dialogue box. From that dialogue box, you can assign a category to your icon. You can simply create a new category or click on Add to All button to assign the icon to a custom category.
![]()
Step 4: Insert the uploaded SVG icon in Slider
To insert the icon in your Slider Revolution slides, click on the + button showing up on the icon.
![]()
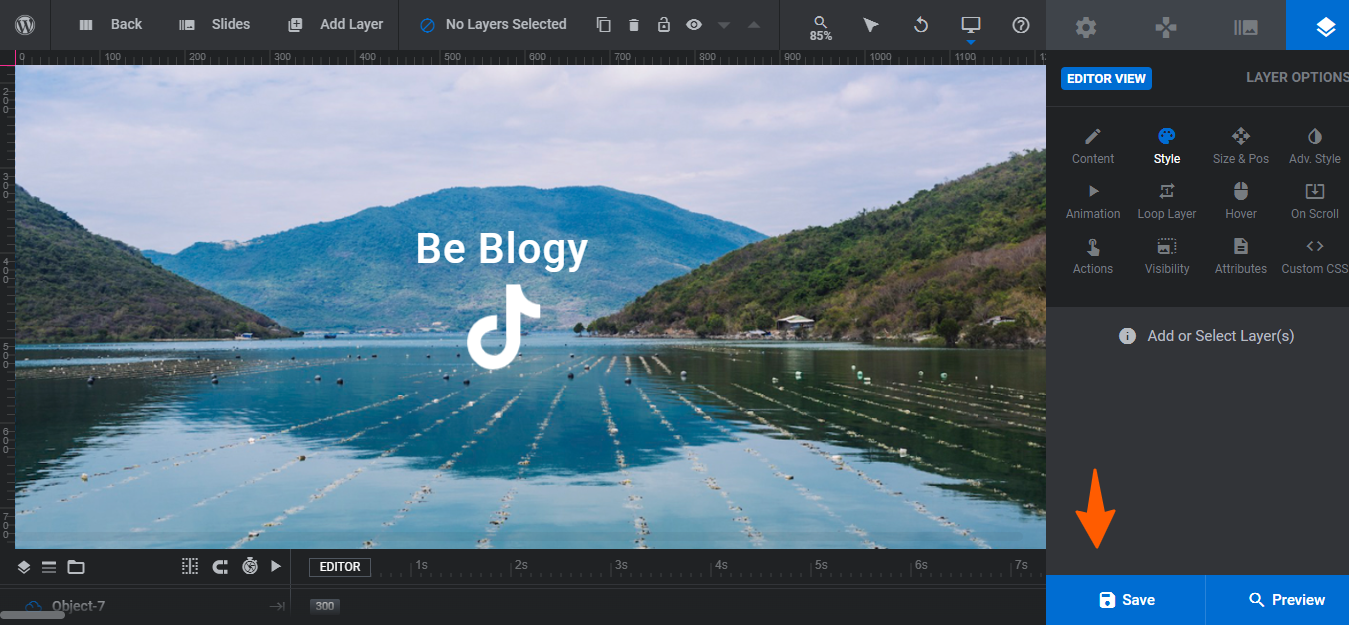
Step 5: Style the SVG icon using Slider Revolution
Now, your icon has been successfully inserted into the slider. Select the icon and drag it to any position you want. For styling the icon, navigate to the right sidebar of the SR panel. Click on the Style tab. Then explore all the styling options in the SVG section that falls under the Style tab. You can change the color of your SVG icon by using the SVG Color option.
![]()
Step 6: Insert a Link on the Icon
Select the icon and switch to the Actions tab from the right sidebar of the Revolution Slider.
![]()
Step 7: Click on the Simple Link option
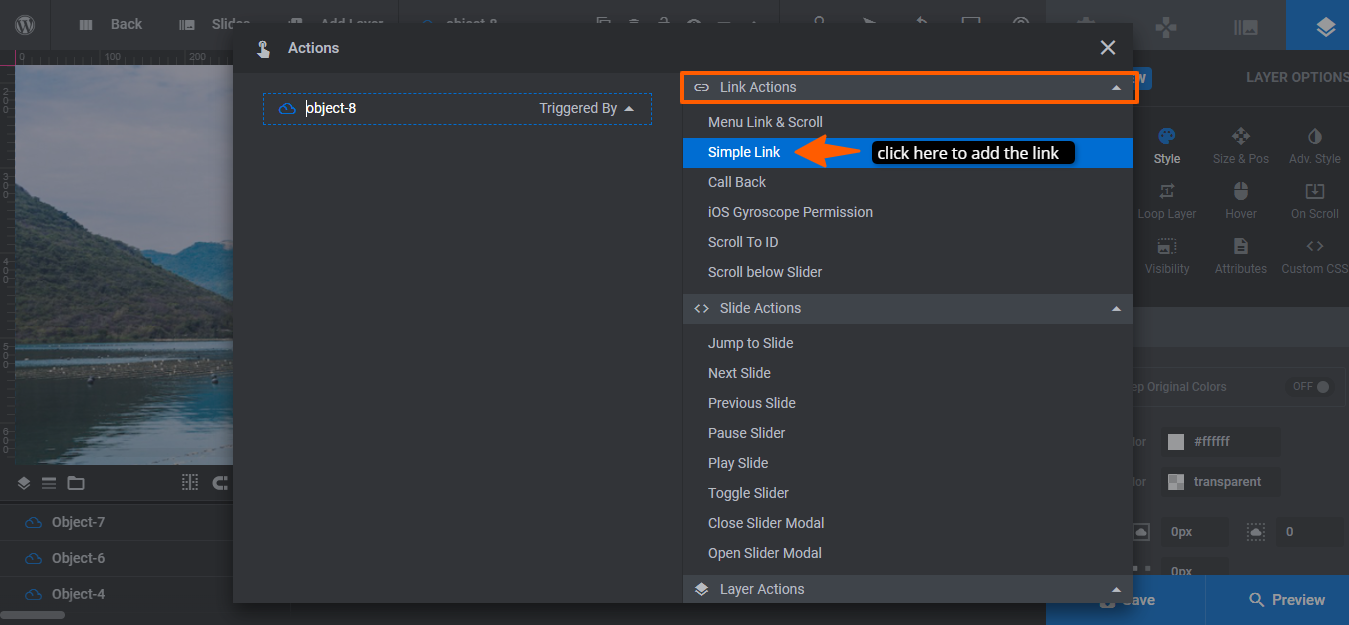
In this step, a dialogue box named Actions will be opened. Click on the Simple Link option that resides in the Link Actions dropdown menu.
Step 8: Enter the Link URL in the Actions Dialogue box
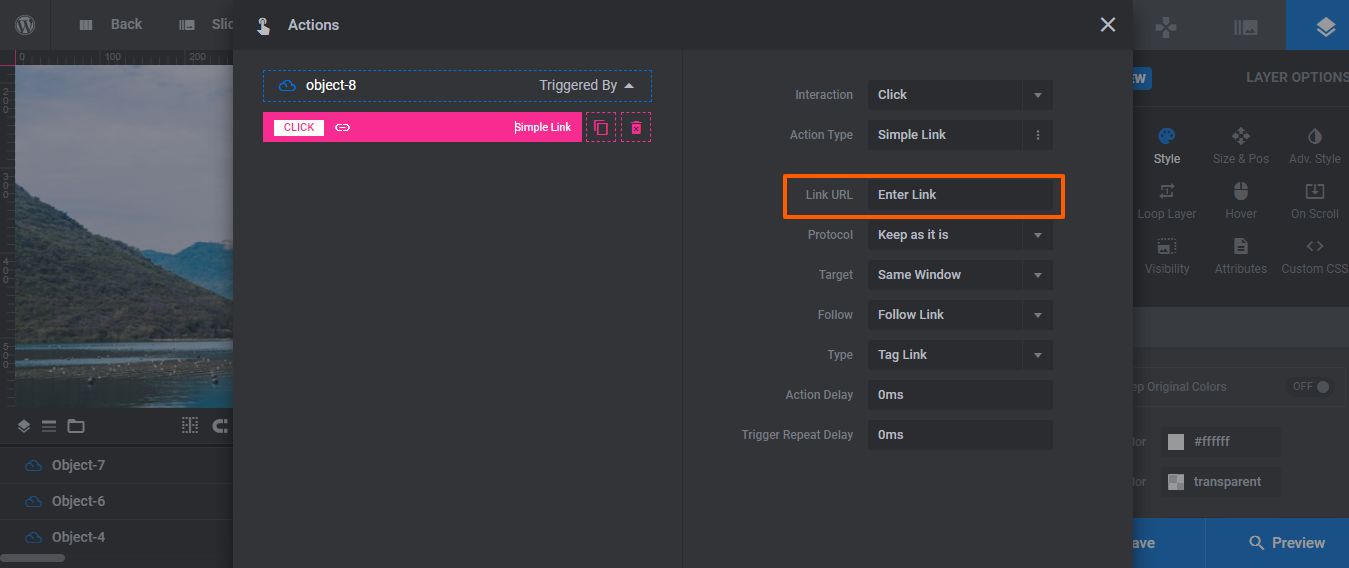
In this step, you just simply need to add the URL of the page which you want to link with your icon. Enter your desired URL in the Link URL field. Your link will automatically be saved.
Step 9: Save your changes
At last, when you are done with all the edits in your slider, click on the Save button located at the bottom right corner of the Slider Revolution sidebar. This is it!
You can preview your slider by clicking on the Preview button next to the Save button.
Conclusion
“Congratulations, you’ve now learned how to add custom SVG icons to Slider Revolution slides using WordPress! By following the step-by-step instructions in this article, you can easily create a slider or carousel using one of the best WordPress plugins named Revolution Slider. Moreover, you can upload stunning, unique SVG icons in Slider Revolution that will help your website stand out from the crowd. With Slider Revolution, the possibilities are endless – you can use your newfound knowledge to create eye-catching logos, icons, and graphics that will keep your audience engaged and captivated. So go ahead, experiment with different designs, and let your creativity run wild. We hope this article has been helpful, and we look forward to seeing your amazing custom SVG icons in action!”
You can buy the Slider Revolution plugin from its official website: https://themepunch.pxf.io/5gk0W9
If you want to learn more about website development, have a look at our other interesting articles: How to easily make money from blogging websites? and “How to Create a Contact Form in WordPress?


Leave A Comment